Tag Cloud
Currently Reading
Latest Book Reviews
- Certified Kubernetes Application Developer (CKAD) Study Guide, 2nd Edition Posted on January 11, 2025
- Rancher Deep Dive Posted on March 31, 2023
- Leveraging Kustomize for Kubernetes Manifests Posted on March 24, 2023
- Automating Workflows with GitHub Actions Posted on October 13, 2022
- Deep-Dive Terraform on Azure Posted on August 30, 2022 All Book Reviews
Latest Posts
- Installing Nagios Remote Plugin Executor in FreeBSD 9.1 Posted on January 2, 2013
- Cron monitoring plugin for Nagios Posted on January 2, 2013
- Installing Nagios Remote Plugin Executor in Solaris 11 Posted on December 30, 2012
- Creating large files in Solaris for testing ZFS Posted on December 24, 2012
- FreeBSD diskless PXE booting Posted on December 23, 2012
January 2, 2013
Installing Nagios Remote Plugin Executor in FreeBSD 9.1
by Alpha01
This also installs the Nagios plugins in addition of nrpe. Follow the text-based menu install options. The installer will create and configure the nagios user account, and will install the naios and nrpe plugins in /usr/local/libexec/nagios.
cd /usr/ports/net-mgmt/nrpe2
make install clean
Update permissions.
chown -R nagios:nagios /usr/local/libexec/nagios
Create nrpe config file.
cd /usr/local/etc
cp nrpe.cfg-sample nrpe.cfg
Add the following entry to /etc/rc.conf.
nrpe2_enable="YES"
Edit nrpe.cfg (Example: 192.168.1.5 is my nagios server)
allowed_hosts=192.168.1.5
Start the nrpe daemon.
/usr/local/etc/rc.d/nrpe2 start
nagios freebsd January 2, 2013
Cron monitoring plugin for Nagios
by Alpha01
#!/bin/bash
STATE_OK=0
STATE_WARNING=1
STATE_CRITICAL=2
STATE_UNKNOWN=3

CRON_CHECK=`ps aux | grep cron|grep -v grep|awk '{print $NF}'|grep -E -e '^(/usr/sbin/cron|crond)$'|wc -l`

case "${CRON_CHECK}" in
        0)  echo "Crond is not running."; exit ${STATE_CRITICAL}
        ;;
        1)  echo "Crond is running."; exit ${STATE_OK}
        ;;
        *)  echo "More than one crond process detected / crond is in an unknown state."; exit ${STATE_WARNING}
        ;;
esac
bash nagios December 30, 2012
Installing Nagios Remote Plugin Executor in Solaris 11
by Alpha01
Install gcc
pkg install pkg://sfe/runtime/gcc pkg://sfe/sfe/developer/gcc
Install system headers (not really sure if all listed were necessary):
pkg install SUNWhea SUNWbinutils SUNWarc SUNWgcc SUNWgccruntime SUNWlibsigsegv SUNWgm4 SUNWgnu-automake-110 SUNWaconf
Update your PATH:
PATH=$PATH:/usr/gcc/bin:/usr/sfw/bin:/usr/ccs/bin
export PATH
Manually create nagios user account, home directory, group, and assigned him a password.
mkdir -p /usr/local/nagios
useradd -d /usr/local/nagios -m nagios
groupadd nagios
usermod -G nagios nagios
passwd nagios
Download, extract, compile and install nrpe.
wget http://prdownloads.sourceforge.net/sourceforge/nagios/nrpe-2.13.tar.gz
tar -xvf http://prdownloads.sourceforge.net/sourceforge/nagios/nrpe-2.13.tar.gz
cd /opt/nrpe-2.13
./configure --with-nagios-user=nagios --with-nagios-group=nagios
make install
make install-daemon-config
cp src/check_nrpe /usr/local/nagios/libexec
Update permissions.
chown -R nagios:nagios /usr/local/nagios/
Add the following entry to /etc/services
nrpe 5666/tcp # NRPE
Add the following entry to /etc/inetd.conf
nrpe stream tcp nowait nagios /usr/sbin/tcpd /usr/local/nagios/bin/nrpe -c /usr/local/nagios/etc/nrpe.cfg -i
Convert and add the new legacy inetd entry to SMF.
inetconv
inetconv -e
nagios solaris December 24, 2012
Creating large files in Solaris for testing ZFS
by Alpha01
In the Linux world, I use the dd utility to create files that need to be a certain size. Even though it works perfectly fine, its kind of annoying figuring out the output file’s size of the file. This is because the size is based on the bs (block size) value and the total number of block size count together.
For example, the following dd command creates a 300 mb file called 300mb-test-file. Each block size will be 1000 bytes, and I want of a total of 300,000 blocks.
Formula: ( (1000 x 300000) / 1000000 )
[tony@bashninja ~]$ dd if=/dev/zero of=300mb-test-file bs=1000 count=300000
300000+0 records in
300000+0 records out
300000000 bytes (300 MB) copied, 2.0363 s, 147 MB/s
Luckily in the Solaris world this can be easily accomplished using the mkfile tool, without doing any conversion. We can even use this mkfile tool to easily create test disk files to experiment with ZFS!
root@solaris:~# mkfile 300m testdisk1
root@solaris:~# mkfile 300m testdisk2
root@solaris:~# ln -s /root/testdisk1 /dev/dsk/testdisk1
root@solaris:~# ln -s /root/testdisk2 /dev/dsk/testdisk2
root@solaris:~# zpool create tonytestpool mirror testdisk1 testdisk2
root@solaris:~# zpool status tonytestpool
  pool: tonytestpool
 state: ONLINE
  scan: none requested
config:

        NAME           STATE     READ WRITE CKSUM
        tonytestpool   ONLINE       0     0     0
          mirror-0     ONLINE       0     0     0
            testdisk1  ONLINE       0     0     0
            testdisk2  ONLINE       0     0     0

errors: No known data errors
solaris zfs testing December 23, 2012
FreeBSD diskless PXE booting
by Alpha01
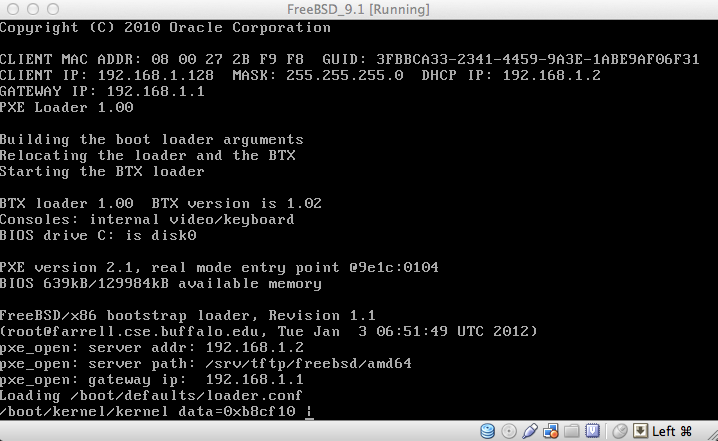
After a couple of trial and error tests and lots of caffeine ingested, I finally managed to install FreeBSD 9.1 over my network completely diskless using ISC’s DHCP, PXE, tftpd-hpa, and NFS.
1). Download iso image and copy over all files. (Where the /srv/tftp/freebsd/amd64 directory is the root directory of the iso files)
wget ftp://ftp.freebsd.org/pub/FreeBSD/releases/amd64/amd64/ISO-IMAGES/9.0/FreeBSD-9.0-RELEASE-amd64-disc1.iso
mount -o loop FreeBSD-9.0-RELEASE-amd64-disc1.iso /mnt
mkdir -p /srv/tftp/freebsd/amd64
cp -a /mnt/* /srv/tftp/freebsd/amd64
cp -a /mnt/.cshrc /srv/tftp/freebsd/amd64
cp -a /mnt/.profile /srv/tftp/freebsd/amd64
cp -a /mnt/.rr_moved /srv/tftp/freebsd/amd64
2). Create the following additional directories:
mkdir /srv/tftp/freebsd/amd64/jails
mkdir -p /srv/tftp/freebsd/amd64/conf/base/jails
mkdir /srv/tftp/freebsd/amd64/conf/default
chmod -R 777 /srv/tftp/freebsd/amd64/conf
chmod -R 777 /srv/tftp/freebsd/amd64/jails
3). Edit /srv/tftp/freebsd/amd64/etc/fstab, comment out the entry in the file:
#/dev/iso9660/FREEBSD_INSTALL / cd9660 ro 0 0
4). Add the following entry to /srv/tftp/freebsd/amd64/etc/rc.conf:
root_rw_mount="NO"
5). NFS configuration:
/srv/tftp/freebsd/amd64 192.168.1.1/24(ro,sync,no_root_squash,no_subtree_check)
6). dhcpd configuration (of course, IP may differ depending on your environment):
192.168.1.128will be the IP that wil be assigned to the new FreeBSD system.192.168.1.2is the IP of the TFTP/NFS server where the installation files are stored in.
The filename path is relative to what path you configured with tftpd-hpa.
host freebsdboot {
  hardware ethernet 08:00:27:2b:f9:f8;
  fixed-address 192.168.1.128;
  filename "freebsd/amd64/boot/pxeboot";
  option root-path "192.168.1.2:/srv/tftp/freebsd/amd64";
}

Resources
- http://forums.freebsd.org/showthread.php?t=30069
- http://lists.freebsd.org/pipermail/freebsd-questions/2012-March/238969.html
- http://box.matto.nl/disklessfreebsd.html
freebsd 