Tag Cloud
Currently Reading
 Study Guide")
Latest Book Reviews
- Certified Kubernetes Application Developer (CKAD) Study Guide, 2nd Edition Posted on January 11, 2025
- Rancher Deep Dive Posted on March 31, 2023
- Leveraging Kustomize for Kubernetes Manifests Posted on March 24, 2023
- Automating Workflows with GitHub Actions Posted on October 13, 2022
- Deep-Dive Terraform on Azure Posted on August 30, 2022 All Book Reviews
Latest Posts
- Configuring Postfix to use Gmail Posted on May 25, 2019
- Automatically Disable Different Jenkins Projects at Build Time Posted on March 16, 2019
- Accessing KVM Guest Using Virtual Serial Console Posted on November 10, 2018
- Nagios SSL Certificate Expiration Check Posted on November 4, 2018
- Log Varnish/proxy and Local Access Separately in Apache Posted on November 4, 2018
May 25, 2019
Configuring Postfix to use Gmail
by Alpha01
Configuring Postfix to use Gmail as the outgoing SMTP relay endpoint is a relatively simple process. I’m my case, I’m not using an @gmail.com account. Rather, since all of my domains use G Suite, I’ve created a special dedicated email account that I’ll be using to send out email from.
Before starting configuring Postfix, it is important that you enable “Less secure app access” on the Gmail account that you will be configuring to send outgoing messages.
I’m using CentOS 7.x as my mail server OS. These were the steps I used to configure Postfix.
1). Install necessary packages:
yum install postfix mailx cyrus-sasl cyrus-sasl-plain
2). Create /etc/postfix/sasl_passwd file with the your authentication credentials:
[smtp.gmail.com]:587 [email protected]:mypassword
3). Update file permissions to lockdown access to our newly created authentication config file:
chmod 600 /etc/postfix/sasl_passwd
4). Use the postmap command to compile and hash the contents of sasl_passwd:
postmap /etc/postfix/sasl_passwd
5). Update /etc/postfix/main.cf
relayhost = [smtp.gmail.com]:587
smtp_use_tls = yes
smtp_sasl_auth_enable = yes
smtp_sasl_security_options =
smtp_sasl_password_maps = hash:/etc/postfix/sasl_passwd
smtp_tls_CAfile = /etc/ssl/certs/ca-bundle.crt
6). Finally, enable and restart postfix:
systemctl enable postfix
systemctl restart postfix
Lastly, although it’s not needed to get a working Postfix to Gmail STMP config working. I would recommend enabling outgoing throttling. Otherwise Google might temporarily suspend your account from sending messages!
Additional /etc/postfix/main.cf updates:
smtp_destination_concurrency_limit = 2
smtp_destination_rate_delay = 10s
smtp_extra_recipient_limit = 5
In my case, I configured Postfix to only handle two concurrent relay connections, wait at least 10 seconds to send out the email and set the recipient limit to 5 (per queue message session).
NOTE: As I mentioned, since I’m not using an @gmail.com, I had to add an SPF DNS record so that the outgoing emails pass all of Google’s spam tests.
DNS txt record:
v=spf1 include:_spf.google.com ~all
Example received email header that was sent from the newly Postfix to Gmail smtp configuration:
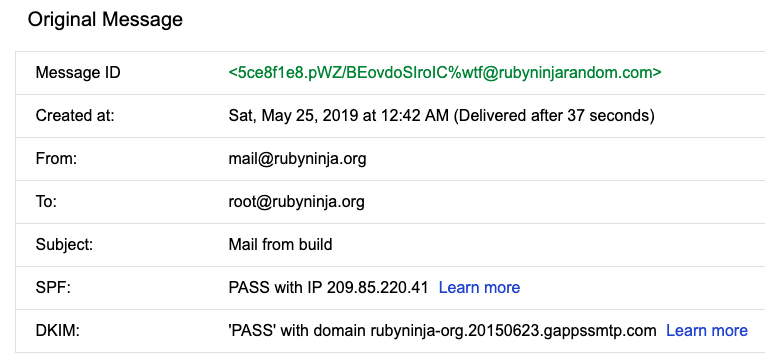
To conclude, it is import to remember that this Postfix configuration will overwrite whatever From source set by your mail user agent (as the above email header image demonstrates).
Resources
- https://www.howtoforge.com/tutorial/configure-postfix-to-use-gmail-as-a-mail-relay
- https://wiki.deimos.fr/Postfix:_limit_outgoing_mail_throttling.html
postfix google March 16, 2019
Automatically Disable Different Jenkins Projects at Build Time
by Alpha01
I use Jenkins as my CI tool for all my personal projects. My current Jenkins build plans are fairly simple and not quite particularly complex (though I do plan on eventually start using Jenkins pipelines on my build jobs in the near future), given that most of my personal projects are WordPress and Drupal sites.
My current configuration consists of two different basic Freestyle projects Jenkins builds. One for my staging build/job and the other for my production build/job respectively. Each time my staging Freestyle project builds, it automatically creates a git tag, which is later used by my production Freestyle project; where it’s pulled, build, and deploy from. This means that at no point I want my production Freestyle project to build whenever the corresponding staging Freestyle project fails (for example unit tests).
Using the Groovy Postbuild Plugin, will give you the ability to modify Jenkins itself. In my case, I want to disable the productions Freestyle project whenever my staging Freestyle project.
On this example my production project build/job is called rubysecurity.org.
import jenkins.*
import jenkins.model.*
String production_project = "rubysecurity.org";
try {
if (manager.build.result.isWorseThan(hudson.model.Result.SUCCESS)) {
Jenkins.instance.getItem(production_project).disable()
manager.listener.logger.println("Disabled ${production_project} build plan!");
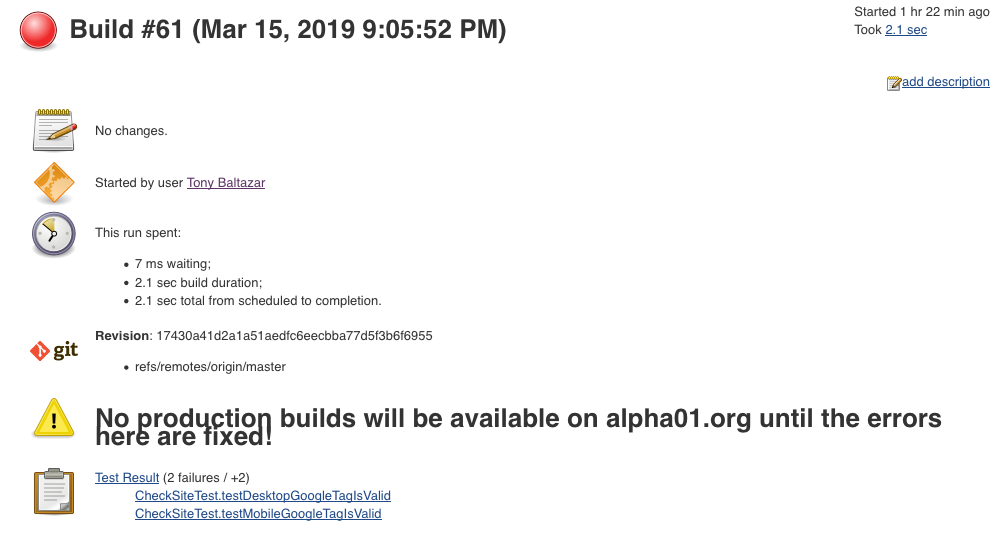
manager.createSummary("warning.gif").appendText("<h1>No production builds will be available on ${production_project} until the errors here are fixed!</h1>", false, false, false, "red")
} else {
Jenkins.instance.getItem(production_project).enable();
manager.listener.logger.println("Enabled ${production_project} build plan.");
}
} catch (Exception ex) {
manager.listener.logger.println("Error disabling ${production_project}." + ex.getMessage());
}
The example Groovy Post-Build script ensures the project build/job rubysecurity.org is enabled if it successfully finishes without any errors, otherwise rubysecurity.org will be disabled, and a custom error message is displayed on the failing staging build/job.
Example error:
Resources
Tags: [jenkins November 10, 2018
Accessing KVM Guest Using Virtual Serial Console
by Alpha01
For the longest time, after creating my KVM guest virtual machines, I’ve only used virt-manager afterwards to do any sort of remote non-direct ssh connection. It wasn’t until now that I finally decided to start using the serial console feature of KVM, and I have to say, I kind of regret procrastinating on this, because this feature is really convenient.
Enabling serial console access to a guest VM is a relatively easy process.
In CentOS, it’s simply a matter of adding the following kernel parameter to GRUB_CMDLINE_LINUX in /etc/default/grub
console=ttyS0
After adding the console kernel parameter with the value of our virtual console’s device block file. Then we have to build new a grub menu and reboot:
grub2-mkconfig -o /boot/grub2/grub.cfg
Afterwards from the host system, you should be able to virsh console onto the guest VM.
The only caveat with connecting to a guest using the virtual serial console is existing the console. In my case, the way to log off the console connection was using Ctrl+5 keyboard keys. This disconnection quirk reminded me of the good old days when I actually worked on physical servers and used IPMI’s serial over network feature and it’s associated unique key combination to properly close the serial connection.
Resources
- https://www.certdepot.net/rhel7-access-virtual-machines-console/
- https://superuser.com/questions/637669/how-to-exit-a-virsh-console-connection
kvm November 4, 2018
Nagios SSL Certificate Expiration Check
by Alpha01
So, a while back I demonstrated a way to to set up an automated SSL certificate expiration monitoring solution.
Well, it turns out the check_http Nagios plugin has built-in support to monitor SSL certificate expiration as well. This is accomplished using the -C / --certificate options.
Example check on a local expired Let’s Encrypt Certificate:
[root@monitor plugins]# ./check_http -t 10 -H www.rubysecurity.org -I 192.168.1.61 -C 10
SSL CRITICAL - Certificate 'www.rubysecurity.org' expired on 2018-07-25 18:39 -0700/PDT.
check_http help doc:
-C, --certificate=INTEGER[,INTEGER]
    Minimum number of days a certificate has to be valid. Port defaults to 443
    (when this option is used the URL is not checked.)

CHECK CERTIFICATE: check_http -H www.verisign.com -C 30,14

 When the certificate of 'www.verisign.com' is valid for more than 30 days,
 a STATE_OK is returned. When the certificate is still valid, but for less than
 30 days, but more than 14 days, a STATE_WARNING is returned.
 A STATE_CRITICAL will be returned when certificate expires in less than 14 days
nagios November 4, 2018
Log Varnish/proxy and Local Access Separately in Apache
by Alpha01
I use Varnish on all of my web sites, with Apache as the backend web server. All Varnish traffic that hits my sites, is traffic that originates from the internet, while all access from my local home network hits Apache directly (Accomplished using local BIND authoritative servers).
For the longest time, I’ve been logging all direct Apache traffic and traffic originating from Varnish to the same Apache access file. It turns out, segmenting the access logs is a very easy task. This can be accomplish, with the help of environment variables in Apache using SetEnvIf.
For example, my Varnish server’s local IP is 192.168.1.150, and SetEnvIf can use Remote_Addr (IP address of the client making the request), as part of it’s set condition. So in my case, I can check if the originating request came from my Varnish server’s “192.168.1.150” address, if so set the is_proxied environment variable. Afterwards I can use the is_proxied environment variable to tell Apache where to log that access request too.
Inside my VirtualHost directive, the log configuration looks like this:
SetEnvIf Remote_Addr "192.168.1.150" is_proxied=1

ErrorLog /var/log/httpd/antoniobaltazar.com/error.log

CustomLog /var/log/httpd/antoniobaltazar.com/access.log cloudflare env=is_proxied
CustomLog /var/log/httpd/antoniobaltazar.com/access-local.log combined
Unfortunately, we can’t use this same technique to log the error logs separately as ErrorLog does not support this.
Tags: [apache varnish