Tag Cloud
Currently Reading
 Study Guide")
Latest Book Reviews
- Certified Kubernetes Application Developer (CKAD) Study Guide, 2nd Edition Posted on January 11, 2025
- Rancher Deep Dive Posted on March 31, 2023
- Leveraging Kustomize for Kubernetes Manifests Posted on March 24, 2023
- Automating Workflows with GitHub Actions Posted on October 13, 2022
- Deep-Dive Terraform on Azure Posted on August 30, 2022 All Book Reviews
Latest Posts
- RIP Nagios Posted on June 7, 2021
- Updating BIND DNS records using Ansible Posted on March 31, 2021
- PHP 7.4 with Remi's RPM Repository Posted on March 29, 2021
- Deploying a 389 Directory Server Posted on March 28, 2021
- Creating an LDAP read-only service account Posted on March 28, 2021
June 7, 2021
RIP Nagios
by Alpha01
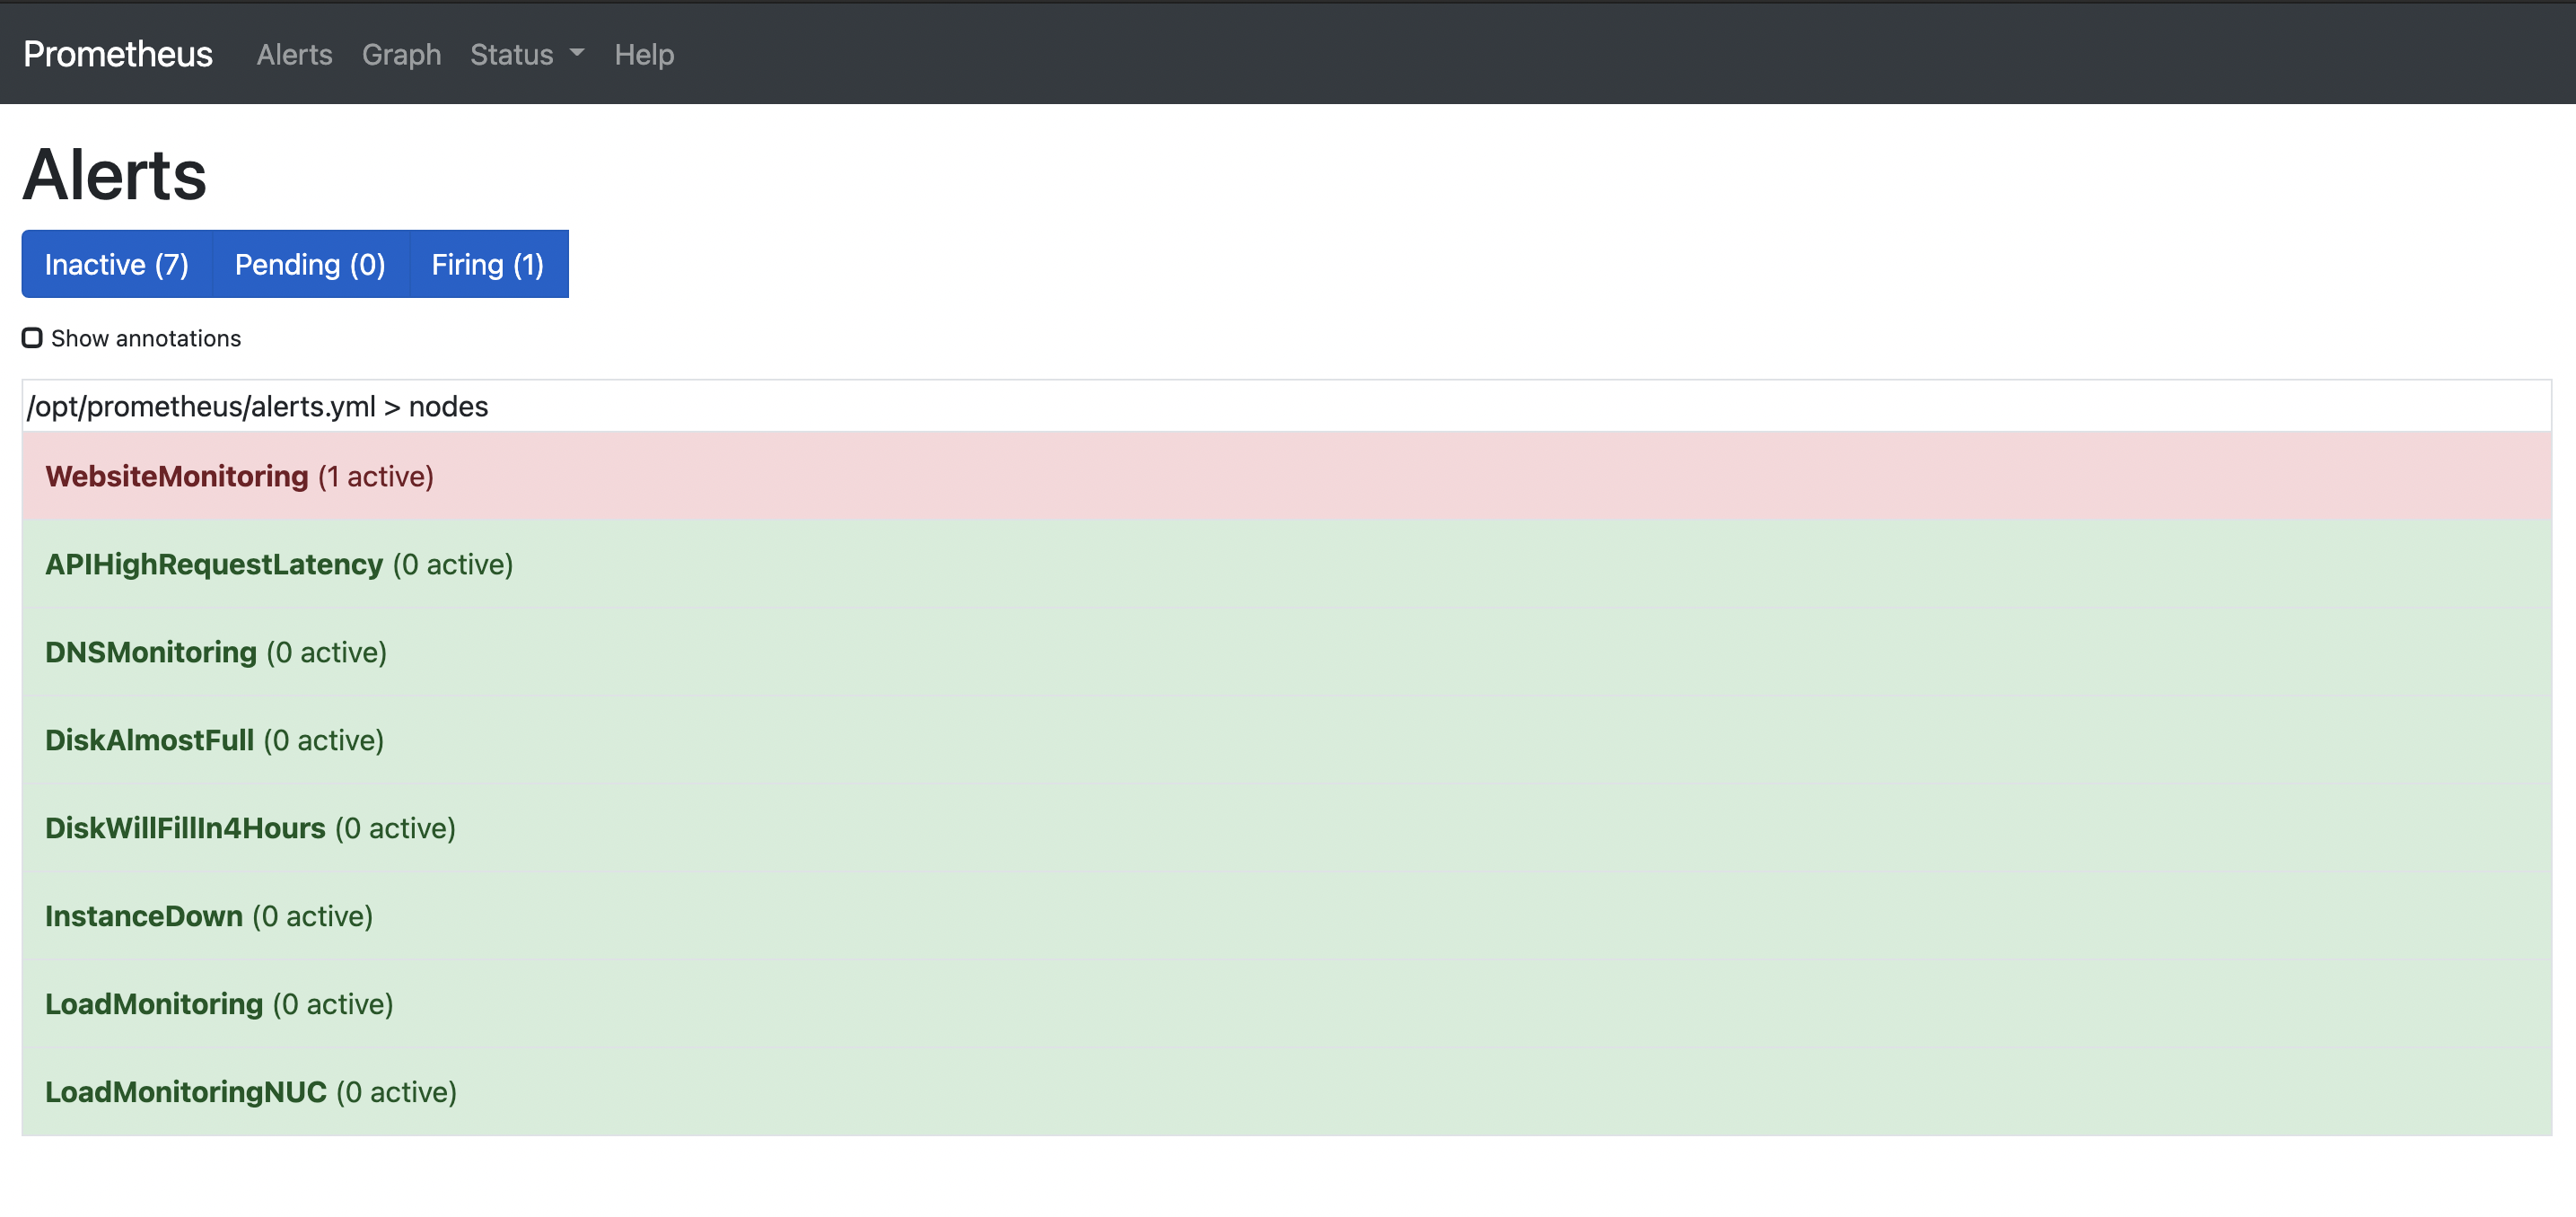
It’s an end of an era, at least with me using Nagios or Nagios Core to be exact. Unless you’ve been living under a rock, Prometheus has become the defacto tool when it comes to system monitoring. While professionally, I stoped using Nagios a few years ago, but I still kept a Nagios server running in my HomeLab for internal monitoring along side Prometheus. What kept me from fully dumping Nagios, was having to migrate some of my custom alerts. However, this weekend I finally decided to give Nagios its final blow and migrate my custom alerts to Prometheus. With the help of the awesome Blackbox exporter, I was able to easily port over my custom http and dns alerts to Prometheus.
Like Nagios, I feel Prometheus also has a steep learning curve. However, overall I feel the benefits Prometheus brings like integration with cloud native system infrastructures, definitely outweigh the drawbacks of this awesome monitoring tool.
prometheus nagios March 31, 2021
Updating BIND DNS records using Ansible
by Alpha01
This is a follow up to the post. Configure BIND to support DDNS updates Now, that I’m able to dynamically update DNS records, this is where Ansible comes in. Ansible is hands down my favorite orchestration/automation tool. So I choose to use it to update my local DNS records going forward.
I’ll be using the community.general.nsupdate module.
I constructed my DNS records on my nameserver’s corresponding Ansible group_vars using the following structure:
all_dns_records:
  - zone: DNS-NAME
    records:
      - record: (@ for $ORIGIN or normal record name )
        ttl: TTL-VALUE
        state: (present or absent)
        type: DNS-TYPE
        value: VALUE-OF-DNS-RECORD
Example
---
all_dns_records:
  - zone: "rubyninja.org"
    records:
      - record: "@"
        ttl: "10800"
        state: "present"
        type: "A"
        value: "192.168.1.63"
      - record: "shit"
        ttl: "10800"
        state: "present"
        type: "A"
        value: "192.168.1.64"
  - zone: "alpha.org"
    records:
      - record: "@"
        ttl: "10800"
        state: "present"
        type: "A"
        value: "192.168.1.63"
      - record: "test"
        ttl: "10800"
        state: "present"
        type: "A"
        value: "192.168.1.64"
[...]
Deployment Ansible playbook:
---
- hosts: ns1.rubyninja.org
  pre_tasks:
    - name: Get algorithm from vault
      ansible.builtin.set_fact:
        vault_algorithm: "{{ lookup('community.general.hashi_vault', 'secret/systems/bind:algorithm') }}"
      delegate_to: localhost

    - name: Get rndckey from vault
      ansible.builtin.set_fact:
        vault_rndckey: "{{ lookup('community.general.hashi_vault', 'secret/systems/bind:rndckey') }}"
      delegate_to: localhost

  tasks:
    - name: Sync $ORIGIN records"
      community.general.nsupdate:
        key_name: "rndckey"
        key_secret: "{{ vault_rndckey }}"
        key_algorithm: "{{ vault_algorithm }}"
        server: "ns1.rubyninja.org"
        port: "53"
        protocol: "tcp"
        ttl: "{{ item.1.ttl }}"
        record: "{{ item.0.zone }}."
        state: "{{ item.1.state }}"
        type: "{{ item.1.type }}"
        value: "{{ item.1.value }}"
      when: item.1.record == "@"
      with_subelements:
        - "{{ all_dns_records }}"
        - records
      notify: Sync zone files
      delegate_to: localhost

    - name: Sync DNS records"
      community.general.nsupdate:
        key_name: "rndckey"
        key_secret: "{{ vault_rndckey }}"
        key_algorithm: "{{ vault_algorithm }}"
        server: "ns1.rubyninja.org"
        port: "53"
        protocol: "tcp"
        zone: "{{ item.0.zone }}"
        ttl: "{{ item.1.ttl }}"
        record: "{{ item.1.record }}"
        state: "{{ item.1.state }}"
        type: "{{ item.1.type }}"
        value: "{{ item.1.value }}"
      when: item.1.record != "@"
      with_subelements:
        - "{{ all_dns_records }}"
        - records
      notify: Sync zone files
      delegate_to: localhost

  post_tasks:
    - name: Check master config
      command: named-checkconf /var/named/chroot/etc/named.conf
      delegate_to: ns1.rubyninja.org
      changed_when: false

    - name: Check zone config
      command: "named-checkzone {{ item }} /var/named/chroot/etc/zones/db.{{ item }}"
      with_items:
        - "{{ all_dns_records | map(attribute='zone') | list }}"
      delegate_to: ns1.rubyninja.org
      changed_when: false

  handlers:
    - name: Sync zone files
      command: rndc -c /var/named/chroot/etc/rndc.conf sync -clean
      delegate_to: ns1.rubyninja.org
My DNS deployment a playbook breakdown:
- Grabs the Dynamic DNS update keys from HashiCorp Vault
- Syncs all of @ $ORIGIN records for all zones.
- Syncs all of the records.
- For good measure, but not necessary: Checks named.conf file.
- For good measure, but not necessary: Checks each individual zone file.
- Force dynamic changes to be applied to disk.
Given that in my environment I have roughly a couple of dozen DNS records, the structured for DNS records works in my environment. Thus said, my group_vars file with all my DNS records is almost 600 lines long. The playbook executing run takes around 1-2 minutes to complete. If I were to be in an environment where I had thousands of DNS records, the approached that I described here might not be the most efficient.
ansible bind March 29, 2021
PHP 7.4 with Remi's RPM Repository
by Alpha01
Containerizing all my web applications has been on my things to do list for some years now. Until then, I shall continue to run some of my apps in a traditional VM shared environment.
Remi’s RPM Repository is the best RPM based repository if you want to easily run the latest upstream version of PHP. One of the benefits of using this repository in a shared environment is the ability to easily run multiple versions of PHP. My sites have been on PHP 7.2 until a few minutes ago. This was because PHP 7.2 is officially deprecated and no longer maintained, so being a good internet citizen I needed to upgrade to the latest PHP 7.4.
Upgrading to PHP 7.4 is extremely easy (assuming your app is not using and legacy functionality that was removed or changed). Since I had PHP 7.2 already running, I simply query for all php72 packages installed on my system, then install their php74 counterpart.
for package in $(rpm -qa --queryformat "%{NAME}\n"|grep php72 |sed 's/php72/php74/g'); do yum install -y $package; done
All of the different PHP configurations can be found under /etc/opt/remi. Once all the packages have been installed, I ported over all my custom PHP ini and fpm settings. In addition I had to change the FPM node pool’s default listening node port. For example /etc/opt/remi/php74/php-fpm.d/www.conf
listen = 127.0.0.1:9002
This is to avoid a port collision with the already running PHP-FPM pool that is being used by 7.2
Afterwards, I’m able to start my new PHP 7.4 FPM node pool.
systemctl enable php74-php-fpm
systemctl start php74-php-fpm
The last step, is simply updating my site’s Apache configuration to point to the new PHP 7.4 FPM node port.
<VirtualHost *:80>
    DocumentRoot /www/shit.alpha01.org

    ServerName shit.alpha01.org
    ServerAlias www.shit.alpha01.org

    SetEnvIf Remote_Addr "192.168.1.150" is_proxied=1

    ErrorLog /var/log/httpd/shit.alpha01.org/error.log
    CustomLog /var/log/httpd/shit.alpha01.org/access.log cloudflare env=is_proxied
    CustomLog /var/log/httpd/shit.alpha01.org/access-local.log combined

    ProxyPassMatch ^/(.*\.php)$ fcgi://127.0.0.1:9002/www/shit.alpha01.org/$1
    ProxyTimeout 120
</VirtualHost>
php March 28, 2021
Deploying a 389 Directory Server
by Alpha01
So it’s been roughly nine months since I created a useful technical post on this site. So what better way to than to post the information about the newly deployed LDAP 389 Directory Server I just did on my homelab.
Ever since Red Hat announced that RHEL was going to be of no cost for developer and testing personal use (with limits, of course). This was perfect occasion for me to start using RHEL 8.
Install
1). Disable SELinux (yes, I know. I should do better..)
sudo setenforce 0
2). Update firewall
firewall-cmd --permanent --add-port={389/tcp,636/tcp,9830/tcp}
firewall-cmd --reload
firewall-cmd --list-all
3). Install epel repo
yum install https://dl.fedoraproject.org/pub/epel/epel-release-latest-8.noarch.rpm
yum module install 389-directory-server:stable/default
4). Create LDAP instance
[general]
config_version = 2

[slapd]
root_password = MY_SUPER_ULTRA_SECURE_PASSWORD_HERE

[backend-userroot]
sample_entries = yes
suffix = dc=rubyninja,dc=org
5). Create 389 DS instance
dscreate from-file nstance.inf
6). Create ~/.dsrc config
[localhost]
# Note that '/' is replaced to '%%2f'.
uri = ldapi://%%2fvar%%2frun%%2fslapd-localhost.socket
basedn = dc=rubyninja,dc=org
binddn = cn=Directory Manager
7). Afterwards, I’m able to verify my installation
[root@ldap ldap]# dsctl localhost status
Instance "localhost" is running
8). Since, I kept the default settings when I created the Create 389 DS instance, my server received the name “localhost”. Hence why my ~/.dsrc config also has the instance configured as “localhost”. The corresponding systemd service and dirsrv@localhost and with the config files stored in /etc/dirsrv/slapd-localhost
systemctl status dirsrv@localhost

ls -l /etc/dirsrv/slapd-localhost/
SSL Configuration
By default the ds-389 setup is using self-sign certificates. The following was used to install my self-sign cert for ldap.rubyninja.org.
1). Create private root CA key ssh signed cert
openssl genrsa -out rootCA.key 4096
openssl req -x509 -new -nodes -key rootCA.key -sha256 -days 4096 -out rootCA.pem
2). I created the following script to easily generate a certificate key-pair signed by my custom local CA.
#!/bin/bash
SAN="DNS:ldap.rubyninja.org,DNS:login.rubyninja.org"

[[ ! -d "./certs" ]] && mkdir certs

cat \
/etc/pki/tls/openssl.cnf \
- \
<<-CONFIG > certs/ca-selfsign-ssl.cnf

[ san ]
subjectAltName="${SAN:-root@localhost.localdomain}"
CONFIG

# generate client key
openssl genrsa -out certs/ssl.key 4096

# generate csr
openssl req \
-sha256 \
-new \
-key certs/ssl.key \
-reqexts san \
-extensions san \
-subj "/CN=ldap.rubyninja.org" \
-config certs/ca-selfsign-ssl.cnf \
-out certs/ssl.csr

# sign cert
openssl x509 -req -in certs/ssl.csr -CA rootCA.pem -CAkey rootCA.key -CAcreateserial -days 2048 -sha256 -extensions san -extfile certs/ca-selfsign-ssl.cnf -out certs/ssl.crt
3). Then I had to certutil utility to view the names and attributes the default SSL certs had.
[root@ldap]# certutil -L -d /etc/dirsrv/slapd-localhost/ -f /etc/dirsrv/slapd-localhost/pwdfile.txt

Certificate Nickname                                         Trust Attributes
                                                             SSL,S/MIME,JAR/XPI

ca_cert                                                      CT,,
Server-Cert                                                  u,u,u
4). Once I made note of the name and attributes of the SSL certificates, we will first need to delete them before replacing them with my custom SSL certs. Deletion:
certutil -d /etc/dirsrv/slapd-localhost/ -n Server-Cert -f /etc/dirsrv/slapd-localhost/pwdfile.txt -D Server-Cert.crt
certutil -d /etc/dirsrv/slapd-localhost/ -n Self-Signed-CA -f /etc/dirsrv/slapd-localhost/pwdfile.txt -D Self-Signed-CA.pem
5). Adding new SSL certs:
certutil -A -d /etc/dirsrv/slapd-localhost/ -n "ca_cert" -t "CT,," -i rootCA.pem -f /etc/dirsrv/slapd-localhost/pwdfile.txt
certutil -A -d /etc/dirsrv/slapd-localhost/ -n "Server-Cert" -t ",," -i ssl/ssl.crt -f /etc/dirsrv/slapd-localhost/pwdfile.txt
6). While the certutil utility manages signed public and CA certificates. Private SSL certificates are managed by the pk12util utility. However, before we use this tool, we must covert the X.509 private ssl certificate to a pkcs12 format.
openssl pkcs12 -export -out certs/ssl.pfx -inkey certs/ssl.key -in certs/ssl.crt -certfile /root/ssl/rootCA.pem
7). Afterwards, we can added it to our LDAP SSL database.
pk12util -d /etc/dirsrv/slapd-localhost/ -i certs/ssl.pfx
8). Lastly, restart the service
systemctl restart dirsrv@localhost
Resources
- https://directory.fedoraproject.org/docs/389ds/howto/quickstart.html#setup-the-instance
- https://directory.fedoraproject.org/docs/389ds/howto/howto-install-389.html
- https://directory.fedoraproject.org/docs/389ds/howto/howto-ssl-archive.html
- https://support.globalsign.com/ssl/ssl-certificates-installation/converting-certificates-openssl
389-directoryserver rhel ldap March 28, 2021
Creating an LDAP read-only service account
by Alpha01
So now that I have an LDAP server up and running. I can finally start creating ldap clients to authenticate to my ldap.rubyninja.org server. Before I can start configuring applications or even adding normal LDAP users, I need to start creating a generic read-only service account.
1). Creating the service account
dsidm localhost user create \
--uid binduser \
--uidNumber 1001 \
--gidNumber 1001 \
--cn binduser \
--displayName binduser
2). Create a password for the service account
dsidm localhost account reset_password uid=binduser,ou=people,dc=rubyninja,dc=org
3). To Modify/add permissions of the binduser service account. I created a file called binduser.ldif with the following contents:
dn: ou=people,dc=rubyninja,dc=org
changetype: modify
add: aci
aci: (targetattr="*") (version 3.0; acl "Allow uid=binduser reading to everything";
 allow (search, read) userdn = "ldap:///uid=binduser,ou=people,dc=rubyninja,dc=org";)
Apply the changes
ldapmodify -H ldaps://localhost -D "cn=Directory Manager" -W -x -f binduser.ldif
NOTE: A fair warning, although I’ve worked with LDAP and had some experience with it. Even at some point one of my job responsibilities was managing an enterprise OpenLDAP infrastructure. LDAP is not quite one of my forté, so in no way shape or form are these best practices! These is just a mere POC for my homelab.
Resources
Tags: [389-directoryserver ldap